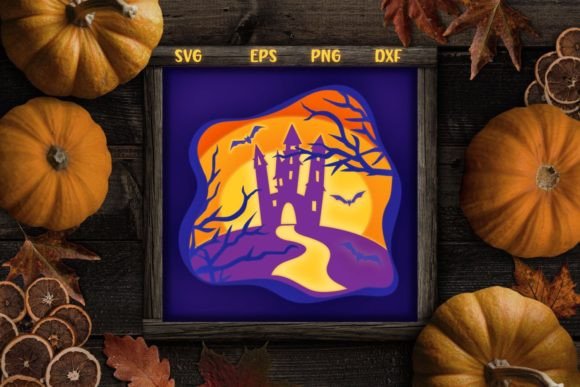
Haunted Castle Halloween Shadow Box SVG Guide
There is a distinct satisfaction in transforming a flat sheet of material into a scene that breathes with depth and atmosphere. When the air turns crisp and the days grow shorter, many creators look for projects that capture the eerie elegance of the season without relying on mass-produced decorations. The Haunted Castle Halloween Shadow Box SVG offers precisely this opportunity. It is not merely a cut file; it is a structured blueprint for building a three-dimensional narrative within a frame. By utilizing seven distinct layers plus a background, this design allows crafters to manipulate light and shadow to create a spooky yet sophisticated focal point for any home.
This specific design features classic Halloween iconography: a looming castle silhouette, a glowing moon, scattered stars, gnarled spooky trees, and a swarm of bats. However, the true magic lies in the layering. Unlike standard vinyl decals or single-layer paper cuts, a shadow box requires planning regarding depth, spacing, and illumination. To bring this Haunted Castle Halloween Shadow Box SVG to life, you will need LED lights to backlight the scene, turning a static image into a dynamic display that changes as the ambient light in the room shifts from day to night.
Understanding the Architecture of Depth
Working with a multi-layer SVG requires a shift in mindset from two-dimensional crafting to spatial design. The Haunted Castle Halloween Shadow Box SVG is engineered with seven specific layers. Each layer serves a purpose in creating the illusion of distance. The background layer sets the sky and the moon, providing the canvas upon which the rest of the scene rests. The subsequent layers introduce the castle, the trees, and the foreground elements like bats.
For those new to papercraft or laser cutting, the concept of "spacer" material is crucial. Between each of the seven cut layers, you must insert foam tape, cardboard strips, or 3D printing spacers. The thickness of these spacers determines the intensity of the shadows. A thicker gap allows light to cast longer, softer shadows, enhancing the mysterious vibe of the castle. Conversely, tighter spacing creates a sharper, more graphic look. This flexibility means two people can use the exact same Haunted Castle Halloween Shadow Box SVG and produce entirely different visual results based on their choice of materials and spacing.
Lighting is the engine of this project. Without LED strips or fairy lights placed behind the background layer, the depth is lost. The light filters through the cutouts, highlighting the edges of the paper or wood and casting the silhouettes against the back panel. When selecting your LEDs, consider the color temperature. A cool white light mimics moonlight, fitting the spooky theme perfectly, while a warm amber glow can suggest distant windows or firelight within the castle walls.
Creative Variations and Material Choices
While the default application of this design often involves black cardstock against a colored background, the potential for customization is vast. Creators should view the Haunted Castle Halloween Shadow Box SVG as a foundation rather than a rigid rulebook. Changing the materials can drastically alter the final aesthetic.
- Paper Crafting: Using textured cardstock adds a tactile quality. Hand-painting details on the castle layer before assembly can introduce subtle colors like deep purples or midnight blues.
- Wood and Laser Cutting: For a more durable, heirloom-quality piece, this SVG is ideal for laser cutters. Thin birch plywood or basswood creates a rustic, organic feel. The natural grain of the wood interacts beautifully with the LED light.
- Acrylic and Modern Design: Cutting the layers from colored acrylic sheets creates a stained-glass effect when lit. This approach modernizes the traditional spooky theme, making it suitable for contemporary interior design.
- Fabric and Textiles: Advanced users can adapt the layers for fabric art, using stiffened felt or buckram to create a soft, textile-based shadow box that feels cozy rather than chilling.
The key to a successful variation is maintaining contrast. Regardless of the material, ensure that the foreground elements stand out clearly against the background. If you choose dark woods or black paper, your background needs to be light enough for the LEDs to penetrate, or you must rely on the silhouette effect where the layers are opaque and the light only shines around the edges.
Applications for Different Creators
The versatility of the Haunted Castle Halloween Shadow Box SVG makes it a valuable asset for various types of creators, from hobbyists to small business owners.
For Home Decor Enthusiasts: This project is perfect for creating custom mantle pieces or entryway displays. Because the dimensions can be scaled to fit standard frames (such as 8x10 or 11x14 inches), it integrates seamlessly into existing decor. It offers a way to celebrate the holiday without cluttering the home with disposable plastic items.
For Educators and Workshop Leaders: Teaching the principles of light, shadow, and layering is easier with a pre-designed SVG. Instructors can use this file to demonstrate how digital designs translate into physical objects. It teaches students about patience and precision, as aligning seven layers requires careful attention to detail.
For Small Business Owners and Makers: Seasonal decor is a significant market. A finished shadow box commands a higher price point than a simple print due to the labor and materials involved. Sellers can offer customization options, such as adding a family name to the base layer or changing the color scheme to match a customer's specific party theme. The Haunted Castle Halloween Shadow Box SVG provides a professional-looking product that stands out in online marketplaces.
Practical Tips for Assembly and Finish
To ensure your project looks polished and professional, organization during the assembly process is vital. Before applying any adhesive, perform a "dry fit." Stack all seven layers with your chosen spacers to check the alignment. Ensure the bats and trees do not obscure critical parts of the castle unless intended. Once satisfied, number the layers lightly in pencil on the back to avoid confusion during gluing.
When installing the LED lights, conceal the wiring as much as possible. If using a deep frame, hide the battery pack in a small compartment attached to the back of the frame or within the depth of the box itself. For a cleaner look, consider using USB-powered strips if the shadow box will be displayed near an outlet, eliminating the need to change batteries.
Finally, consider the framing. A deep-set shadow box frame is necessary to accommodate the seven layers plus the lighting rig. If a pre-made deep frame is unavailable, you can build one using wooden crate sides or by stacking multiple standard frames. Painting the interior sides of the frame black can prevent light reflection and keep the focus strictly on the illuminated castle scene.
The Haunted Castle Halloween Shadow Box SVG is more than a seasonal craft; it is an exercise in dimensional design. Whether you are a seasoned laser cutter operator or a paper crafting beginner, this project invites you to explore how light interacts with form. By paying attention to the details of layering, spacing, and illumination, you can create a piece of art that captures the magic of Halloween and serves as a testament to your creativity. Visit the preview images to study the layering order, gather your materials, and begin constructing your own haunted horizon.