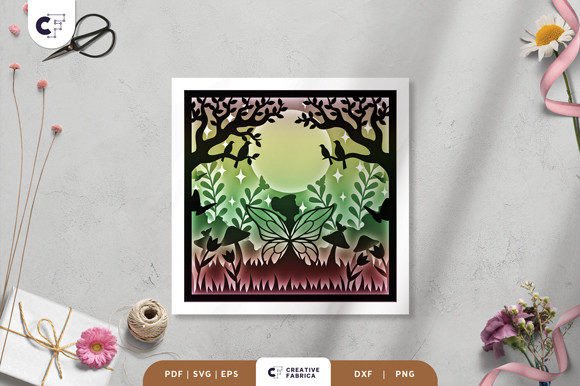
Bringing Spring to Life: A Practical Guide to the Spring Pond 3D Shadow Box SVG
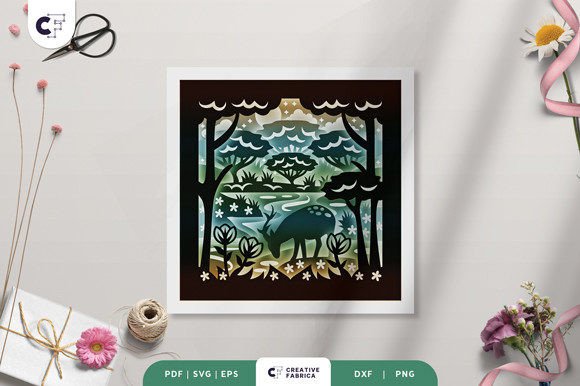
Hello, crafters. Whether you are a small business owner looking to expand your product line, a hobbyist seeking a relaxing weekend project, or an educator planning a hands-on art lesson, the integration of digital design files into physical creation requires a clear workflow. The Spring Pond 3D Shadow Box SVG represents more than just a downloadable image; it is a structured asset designed for layered paper crafting. This layered, square paper cutting template captures the essence of a spring pond scene, offering a versatile foundation for framed wall decorations or illuminated light boxes. Understanding how to effectively incorporate this file into your creative process ensures high-quality results and efficient production.
Understanding the Asset and File Compatibility
Before beginning any physical assembly, it is crucial to understand the technical specifications of the digital asset you are working with. The Spring Pond 3D Shadow Box SVG is provided in a comprehensive suite of formats: SVG, PDF, EPS, PNG, and DXF. This variety is intentional, catering to different workflows and equipment capabilities. For users operating within a digital fabrication environment, the SVG file is optimized for compatibility with major cutting machines such as Silhouette and Cricut. These vector-based files allow for precise path definition, ensuring that intricate details of the pond life and foliage are cut cleanly.
However, not every creator has access to automated cutting technology. The inclusion of PDF and PNG formats ensures that the project remains accessible for those who prefer manual methods. If you do not have a cutting machine, you can utilize an art knife and scissors to execute the design. The DXF and EPS files serve professionals who may be using industrial plotters or importing the design into broader graphic design software for modification before production. This multi-format approach removes barriers to entry, allowing the project to fit seamlessly into diverse operational setups, from home studios to commercial print shops.
Preparation and Material Selection
Successful execution of a 3D shadow box relies heavily on material selection and preparation. The structural integrity of the final piece depends on the weight and texture of the paper used. For this specific design, Encore Cardstock 80 lb cover (216 gsm) is recommended. This weight provides the necessary rigidity to hold the layers apart without warping, while still being thin enough to allow light transmission if you choose to create a light box variant. Using cardstock that is too thin may result in sagging layers that obscure the 3D effect, while paper that is too thick can make folding and gluing difficult.
When preparing your workspace, organization is key. The template consists of 7 distinct layers. Before cutting or printing, ensure your digital file is set to the correct dimensions. The standard size is 20.32 × 20.32 cm (approximately 8x8 inches). While SVG files can be resized to fit different frame sizes, it is imperative to maintain the same aspect ratio. Distorting the aspect ratio will misalign the layers during assembly, breaking the visual continuity of the pond scene. Once resized, organize your cut files or printed sheets in sequential order. Labeling each layer immediately after cutting prevents confusion during the assembly phase, a common bottleneck in multi-layer projects.
The Assembly Workflow: From Flat to Dimensional
The transition from flat cardstock to a dimensional artwork is where the magic happens. This process requires patience and precision. You will need glue or double-sided tape to assemble the design. Foam adhesive squares are often preferred by professionals as they provide consistent spacing between layers, enhancing the shadow effect. Begin by identifying the background layer and the foreground elements. Apply your adhesive methodically to the designated contact points. It is advisable to perform a "dry fit" of all seven layers before applying any adhesive. This step acts as a quality control measure, allowing you to verify alignment and check for any debris or cutting errors that might interfere with the stack.
As you build up the layers, press gently but firmly to ensure a secure bond. Pay close attention to the delicate elements of the spring pond theme, such as reeds, lily pads, or wildlife silhouettes. Misalignment at this stage can cast unintended shadows or hide critical design features. If you are producing these in bulk for a small business, consider creating a jig or template to speed up the alignment process. Consistency in spacing between layers is vital for maintaining the professional look of the final product. This attention to detail distinguishes a handmade item from a mass-produced decoration, adding value for your customers or recipients.
Enhancing the Project: Lighting and Display Options
One of the most versatile aspects of the Spring Pond 3D Shadow Box SVG is its adaptability for different display contexts. While it functions beautifully as a standard framed wall decoration, it can be transformed into a captivating light box. By adding LED strips between the layers during assembly, you introduce a special effect that highlights the depth of the design. The light filters through the varying densities of the cardstock and the gaps between layers, creating dynamic shadows that change with the viewing angle.
Implementing the lighting element requires additional planning. You must account for the power source and the thickness of the frame needed to house both the paper layers and the lighting components. Battery-operated LED strips are often the most practical choice for wall hangings, as they eliminate the need for nearby electrical outlets. When integrating lights, ensure they are positioned evenly to avoid hot spots that could distract from the overall composition. This enhancement turns a static image into an interactive piece of decor, making it an excellent gift for friends, family, or someone special who appreciates unique, handcrafted items.
Quality Control and Final Considerations
Throughout the production process, maintain a focus on quality control. Note that preview images online are for reference only; the actual final product color may slightly vary due to lighting sources and the specific paper color chosen. This variance is a natural part of working with physical materials. If you are selling these items, manage customer expectations by clearly stating that slight color variations occur. For personal projects, embrace the uniqueness that different cardstock colors bring to the design. Testing a single unit before committing to a large batch allows you to refine your technique and adjust your material choices if necessary.
Long-term usability of this asset extends beyond a single project. Because the SVG file is scalable, you can revisit the design months or years later to create different sizes for various applications, such as greeting cards, larger wall art, or even stencils for other mediums. The modular nature of the 7-layer system also allows for creative experimentation. Advanced users might choose to omit certain layers for a flatter look or swap out specific middle layers with custom-cut elements to personalize the scene further.
In conclusion, the Spring Pond 3D Shadow Box SVG is a robust tool for creators aiming to produce high-quality, dimensional paper art. By understanding the file formats, selecting the appropriate 216 gsm cardstock, and following a disciplined assembly workflow, you can achieve professional results. Whether utilized for personal relaxation, educational demonstrations, or commercial product lines, this template offers a reliable pathway from digital concept to tangible beauty. With the right preparation and attention to detail, you can efficiently integrate this spring-themed design into your creative repertoire, delivering stunning visual experiences that celebrate the season.
Note: All cardstock featured in our examples is Encore Cardstock 80 lb cover 216 gsm. For those looking to source high-quality materials, you can visit the 12×12 Cardstock Shop. This is a paid link at no extra cost to you, supporting the creation of more free tutorials and resources.