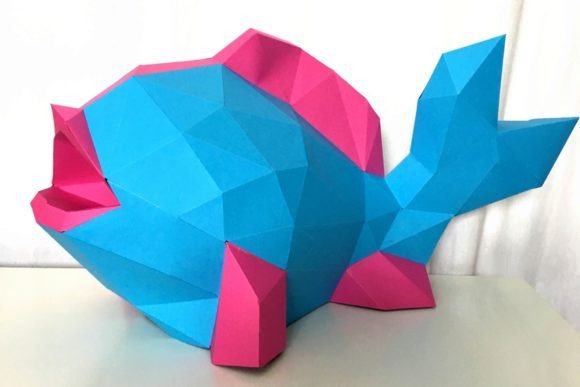
Bring Life to Walls with Fish Paper Sculpture
There is a distinct satisfaction in transforming a flat sheet of paper into a three-dimensional object that seems to swim right off the wall. This is the core appeal of Fish Paper Sculpture, a creative endeavor that blends minimalist design with hands-on crafting. Whether you are looking to refresh a stale living room corner, add a whimsical touch to a garden party, or simply find a relaxing hobby that yields tangible results, this papercraft offers a unique solution. Unlike complex origami that requires precise folding memory or expensive clay modeling that needs kilns and tools, paper sculpture relies on accessible materials and a modern aesthetic that fits seamlessly into contemporary decor.
The specific template created by Sofs Design exemplifies why this craft has gained traction among both beginners and seasoned makers. It is designed to make your space "funnier"—in the sense of being more fun, lively, and engaging. The resulting sculpture is not just a child's craft project; it is a piece of modern art that you build yourself. The clean lines and geometric forms allow it to serve as a statement piece in a professional office, a colorful accent in a nursery, or an eye-catching backdrop for social media content. Because the design is scalable, you have the freedom to tweak the size to fit your specific spatial needs, provided you resize each page or SVG file equally to maintain the structural integrity of the model.
Why Choose Papercraft for Home Decor?
In an era of mass-produced plastic decorations and generic wall art, creating your own decor provides a level of personalization that is hard to match. Fish Paper Sculpture addresses several common goals for homeowners and creators alike. First, it is incredibly cost-effective. The supplies required are readily available at any local craft store or even office supply shop. Second, the skill barrier is low. You do not need years of artistic training to assemble these models; you simply need patience and the ability to follow clear instructions. Finally, the environmental impact is minimal compared to buying new plastic items, especially if you use recycled cardstock.
For educators and parents, this activity serves as a fantastic tool for developing fine motor skills and spatial reasoning. For entrepreneurs and small business owners, particularly those in the event planning or interior styling sectors, these sculptures offer a customizable prop that can be tailored to specific color schemes or themes. A school of these paper fish can transform a bland conference room into an immersive underwater experience for a product launch or a themed party. The versatility lies in the material; by changing the color or texture of the paper, you completely alter the mood of the piece without changing the design itself.
Essential Tools and Materials
Before diving into the assembly process, gathering the right materials ensures a smooth and enjoyable experience. The quality of your final sculpture depends heavily on the weight and stiffness of the paper you choose. Here is a practical breakdown of what you will need to bring this minimalist decoration to life:
- Paper: The foundation of any good papercraft. You should aim for paper anywhere from 65 lb to card stock 80 lb. This weight provides enough rigidity to hold the 3D shape without being so thick that it becomes difficult to fold or glue. The featured examples often use Encore Cardstock 80 lb cover (216 gsm), which offers a perfect balance of durability and ease of use.
- Cutting Tools: Precision is key. A craft knife and a self-healing cutting mat are ideal for clean edges, though sharp scissors can work for simpler cuts. If you own a digital cutting machine (like a Cricut or Silhouette), you can bypass manual cutting entirely by using the included SVG files.
- Scoring Tool: To get crisp, professional-looking folds, you need to score the paper before bending it. Use a ruler and something not too sharp, like a dull butter knife or a dedicated bone folder, to mark your lines. This prevents the paper from cracking or turning white at the crease.
- Adhesives: A glue stick or double-sided tape is recommended for a clean finish without wet messes. White glue is also an option if you need a stronger bond, but apply it sparingly to avoid warping the paper.
If you opt to use a cutting machine, many of the manual tools listed above become unnecessary, streamlining the process significantly. However, having a ruler and scoring tool on hand is still advisable even for machine-cut pieces to ensure perfect folds.
From Digital File to Physical Art
The workflow for creating your Fish Paper Sculpture is straightforward but rewarding. The product typically includes both PDF and SVG files, catering to different working styles. If you prefer printing at home or at a local print shop, the PDF templates are ready to go on standard letter or A4 paper, which you then cut out. For those with access to vinyl cutters or laser cutters, the SVG files allow for automated precision, saving time and ensuring every tab and slot is identical.
Once your pieces are cut, the assembly begins. This is where the magic happens. You will notice pre-marked lines indicating where to fold. Gently run your scoring tool along these lines, then fold the paper along the scored mark. Apply your adhesive to the designated tabs and press the corresponding edges together. Hold them for a few seconds until the bond sets. As you connect more pieces, the flat shapes will begin to curve and take on the voluminous form of a fish. It is a meditative process that allows you to disconnect from screens and focus on a tactile task.
One of the greatest advantages of this specific template by Sofs Design is the reusability. Once you purchase the instructions and templates, you can make this decoration as many times as you want. This is particularly valuable for teachers needing multiple projects for a class, or event decorators who need a series of matching installations. You can experiment with different color gradients, perhaps making the tail a darker shade than the head to mimic real fish anatomy, or using metallic paper for a festive, shimmering effect.
Important Considerations for Best Results
While the process is beginner-friendly, there are a few nuances to keep in mind to ensure your sculpture looks professional. First, pay close attention to the grain direction of your paper if you are cutting manually. Folding against the grain can sometimes lead to rougher edges, though with 80 lb cardstock, this is less of an issue than with heavier boards. Second, when resizing the files, always maintain the aspect ratio. Distorting the image will cause the tabs and slots to misalign, making assembly frustrating or impossible.
Placement is another factor to consider. While these sculptures are sturdy, they are still made of paper. Avoid placing them in areas with high humidity, such as a bathroom without ventilation, or in direct sunlight where UV rays might fade the colors over time. They are perfect for living rooms, bedrooms, offices, and covered outdoor patios. If you plan to hang them in a garden for a party, ensure they are protected from rain or wind, perhaps by suspending them under a canopy or inside a lantern.
For those interested in sourcing high-quality materials to match the designer's recommendations, selecting the right cardstock can elevate the final look. The specific texture and finish of the paper contribute to how light interacts with the facets of the fish. You can explore options like the 12×12 Cardstock Shop to find varieties similar to the Encore Cardstock mentioned in the instructions. Investing in good paper ensures your sculpture holds its shape for years to come.
Ultimately, Fish Paper Sculpture is more than just a craft; it is an accessible entry point into the world of 3D design and interior styling. It proves that you do not need expensive equipment or vast amounts of space to create something beautiful and impactful. Whether you are a freelancer looking to add a unique background to your video calls, a parent seeking a weekend activity, or a homeowner wanting to inject some personality into your walls, this project delivers. The combination of clear instructions, versatile file formats, and the sheer joy of watching a 2D template become a 3D masterpiece makes it a worthwhile addition to your creative repertoire.